Friday, July 29, 2011

Gray me up on my Sidewalk

I am having a great week so far. Hope you too!! But you know what? TGIF always :)
My sister-in-law is here with her family and I am gonna have some fun with my nephews this weekend.
Here I have to you guys a mani I did last week. I am in such love for grays lately. I think they are a "go color". It's the new black for me. It goes with everything and it's so classic. This bottle of Sidewalker NYC is almost half of it and I better buy another one. That cream opaque gray has a special place in my heart.
I then decided to play with it and did some stamping and put some franken glitter over it. I used one of those Chrome Pens from Sally Hansen. If you are looking for somehting really good to do your stamp I really really recommend you to look for those chrome pens. They usually are $8 dollars. I know it's a little expensive but you know what? Totally worth it. This is the one I used it and HERE you can find more colors. I so like them! Go get yourself one. I don't recommend those chrome pens to paint your whole nails. I just think the brushes coming out of  a pen doesn't feel right for me + that polish dries superrr fast. Other than that it's a thumbs up, a gotta have it for stamping. You won't regret I promise.What do you think and what color are you wearing for this weekend?


BC: NYC
Color: NYC Sidewalkers
Design: BM201
Stamp: Sally Hansen Silver Chrome
TC: 0-60


--> Product sent to me for review <--

Wednesday, July 27, 2011

Pink Wednesday - Jordana Tangy

I have found this pretty coral pink from Jordana that I am just in love. For some reason, I have been so into coral colors lately. I have a shirt I bought this summer that I better have somebody over and hide that for me. I am wearing it all the time.
This is my first time wearing this brand of nail polish. I have picked 4 different shades of Jordana. I love that name. It was my best neighborhood friend's name. How I miss her. Green eyes and freckles. We were always looking fo trouble. Miss that girl.
But anyways, here are some pictures of Jordana Tangy. And I don't know why I have some problems photographing coral/orange colors. The iPhone camera has a HDR feature so I am adding those pictures with that different setting so you can get an idea of the color. I even tried to use a white background since the table I use is gray and it kinda darkens out any bright colors I have on my nails. I know I really should look for a greater way to get better pictures. For today I cropped my pictures ( I like Kellie Gonzo's style)  so you guys can just see more my nails then hands. I just don't like to spend time editing pictures :(
Also I stamped some Konad over that beautiful coral shade and I love it! I then applied a new top coat I found to be as good as Seche Vite. Not better. But good. The Color Club 0-60 does its job. I like it cause it isn't that thick like SV and it doesn't have that strong smell to it. The only difference is that have the shinny factor that the SV adds to your polish. But that's about it on my opnion. Also it's a lot cheaper than SV anyways. But I got admit SV has a specila place in my heart. Below you can see pictures of the color club dry fast top coat.


Here are some of my favorite pink corals I totally recommend.
Jordana Tangy, Essie Tart Deco, Essie Cute as a Button, RIMMEL Orange Sunset

TC: Essie
Color: Jordana Tangy
Stamping: Sally hansen White On
Design: M26
TC: 0-60

Tuesday, July 26, 2011

Giveaway Result

Sorry it took me took long to announce the winners of my giveaway. I just had a crazy weekend and now this week with work. But trust me I was soooo thrilled to make that announcement. So here you have it!

better THE WINNERS ARE ....

I know you must be curious to know who the 4 winners are. Not particularly who they are but if your name is listed here as one of the lucky 4 people who won the Lacquered Me giveaway sponsored by Sally Hansen and NYC Colors. Am I right?
That was my first giveaway here on this blog. I just wanna say THANK YOU to everyone who participated on this giveaway. Thanks for your time filling the form, spreading the word, following and LIKEing pages on FB. You are really sweet and I say THANK YOU!!! If you are not one of the winners don't be frustrated or sad. I know how it feels. " Oh man, I never win anything ;( " But I'll be back more often with some giveaways with more goodies, I promise.
I am just grateful for all of you dropping me comments and compliments that really put me up on sad days. Thanks for the love guys! I can't imagine my life without my cybernetic friends! Love you all <3

Now let the drums rolls ....
The winners are:

mrl_84
raphaelalonza
Tricia2134
CrisKelly

Congrats to you guys!! And, if your name is not listed here don't worry I am planning another giveaway to thank all of you my great followers. Stay tunned!
PS: I have contacted them by email. If they don't write me back in 24hrs I'll be drawing again and other people will be picked up.

Talk Tuesdays - How the vietnamese became salon giants CNN

I was browsing through CNN and saw  this video. Found it very interesting and thought it would be great to share on my Talk Tuesday.
Have you ever asked yourself why most of the nail salons are managed by vietnamese people ? Or  at least have a bunch of them working there? When i moved to the States and went to a nail salon I thought I just happened to go to a vietnamese salon. Then went to another one with a friend of mine for company and there they were again. I was just wondering why they " monopolized" all the nail salons I could find lolo Laugh. Seriously. I was thinking may be doing nails it's a popular vietnamese thing. I don't know. Please leave me a comment so I don't feel stupid thinking  like that myself lolo. But then I watched to this video and I thought it was very interesting information that answered my wondering question I have had for a while. Everything started with a movie in the 70's, a kind actress with beutiful nails and a big heart and 16 hard workers vietnamese women. Such a neat story you have to learn.
You won't regret watching trust me!

Monday, July 25, 2011

Monday PAa - Fruit

Oh I had such a good weekend. Hang out with my friends Nani and Lis and her baby boy who has the most cute eyelash ever. Oh boy, I envy his eyelashes. Seriously! The Friday night I had some friends from Utah over. I cooked for them but ... uhmmm wasn't happy with myself. But it's ok. On Saturday Nani came over with her hubby, brother-in-law and Mabel and we had a blast. I even did her nails. That was the first time I had ever done other people's nails. It turned out really cute. I'll post a picture later.
For now, you don't even need to scroll down to see that supposed to be kiwi-mani lololo
The theme from PAa group this week was FRUIT.
Seriously? I did not like. I'll need to try it again so I can feel proud of myself.
I attempted this ugly kiwi as you can see. For me it looks like a smashed spider on a green floor  - laugh. I am so bad doing free hand designs on my nails. I should have done some stamping you know. It's always safe ... at least for me. But I promise I will try it again and do better. For now that's what I could do.


BC: NYC
Color: NYC 110-Luxury Lime Creme
Sponging: Sally Hansen White On
Stripes: LA Colors Black
TC: Color Club 0-60

Friday, July 22, 2011

Green Apple from Sinful Colors Swatch

TGIF right!!! Yeaeyayey I love Fridays.
So here is a swatch of a shimmer green from Sinful Colors. I have tried this before but didn't get too excited like now. So I got to have a picture for you guys. I liked so much I didn't even want to do any stamping or anything. This green is like those mint greens you can see all over lately but not too bright. I would say it's more subtle than the others. It has this shimmer tone to it that I love and surprisingly the formula, brush and everything is really good. Usually I don't "love" all the Sinful Colors nail polishes. This one I totally recommend.


BC: Essie
Color: Sinful Colors 947- Mint Apple
TC: SV

Wednesday, July 20, 2011

Pink Wednesdays - The Gold & the Beautiful

For today's pink wednesday I have something it reminds me of an indian sari. You know those beautiful indian dresses they have. I am just not sure if I like this OPI pink shade. It's a pinkesh/salmon color. It's shimmer and to get an opaque look you need 3 coats. At least I did. I'm not sure if I will keep this polish. Probably is going to my swap/sell list. Then I decided on going sponging with a gold Wet n' Wild super glittery shimmer. And here you have it:


BC: Essie
Color: OPI Cozu Melted in the Sun
Sponging: Wet n' Wild 223C- The Gold & the Beautiful
TC: SV

Tuesday, July 19, 2011

How to get rid of glitter polish on your nails?

  Have you been so excited to put some cute glitter on your nails and then you hold that thought back cause you know, otherwise a tragic future waits for you?
Yeah, I am talking about the dreadful part of been wrestling with a cotton ball soaked with acetone. Then you rub it rub it  attemping to remove the glitter but the only thing it can removeb is your patience cause you get soooo frustrated by spending so much time in just one single nail. I have been there. I hear your frustration and your glitter fear.
  A while back I found out about a great technique that made my life easier, well as far as glitter on my nail  lololo. After I learned that I am glitter fear free. I can buy glittter polish and actually be excited to wear them cause it would be no problem to be removed when I want to.
So, once we had the Glitter Bomb theme this week on the PAA group on FB, I feel like showing some pictures of me removing my glitter a couple of weeks ago.
  I bet you won't regret it. And I bet you might be skeptical about this but trust me, go ahead and do it fearless and totally hopefull. it will work.
So here is my first tutorial through pictures to my friend Rapha. She asked me to do a video of me showing this but I totally suck in front of a camera. Plus I am not the one who discovered this amazing technique. you can find this everywhere on youtube or vimeo.

Here is what I do when I have glittered nails and what to get rid of it. This technique is known of
Foil or Aluminum Glitter Remove Technique

 You are gonna need just 3 things you probably already have at home:
* Acetone - it has to be 100% acetone
* Cotton balls - cotton pads also works
* Alluminum/Foil - it can be new or used ( I usually get the already used ones form my kitchen. But those clean ones that I would just throw away a while ago. Now I save al of them)

 Oh, the 4th thing you are gonna need is ... your glittered nails right? Oh, this mani I got inspired by a picture I saw on weheartit but it wasn't link to anybody. I hate when they pin pictures but there is no root to the origin to the picture. I just want to let you know it wasn't my creation. But anyways ... continuing

 I unravel the cotton ball to make it flat, I divide and soak it with pure acetone. It doesn't need to be soaked to the point to be dripping ok? So, I cover my nail with it. I try not to cover the whole finger, just put the cotton ball on the top of my nail. Then I come with a piece of foil and cover the whole finger with it. That avoids that the acetone evaporates.

 Do the same thing with all your fingers. I know you are gonna look like an alien. My husband was chocked thinking my nail polish addiction is really ruinning my life to make me that crazy. He thought I was going to wear that outside lololo I just told him it's my Lady Gaga nails lololo But yeah, do that to one hand and wait for  5 to 10 minutes with it.
You can do both hands at the same time but folding foil on the other hand it would be a little hard to manage. Plus I like to do each hand cause i can use the same foil on the other fingers, sometimes even the same cotton balls in there. But when I am in a hurry I do both hands at the same time. It sure saves you time.

 After those 5-10 minutes with each nail cover with acetone and foil it's time to see the magic or miracle, you name it. Remove the "foil cap" twisting back and forth and pulling off. You don't need to put pressure like youa re used to when the subject is glitter. Just do that motion gently. Look at my nail up there! I was just amazed when I did that for the first time. This technique works wonders.

Now a picture of my glitter free nails. My naked nails :) After you are done with this don't forget to wash well your hands with lots of soap and also use a cuticle cream/oil right away. Because you are gonna be soaking your nail with pure acetone, your nails and cuticle you be screaming for some pampering.

I hope you liked this tutorial. And I really hope I helped someone with this information. If you have done this and it has worked out feel free to leave me a comment telling me about your experience. Also if you have  or know of any other good technique to remove glitter from nails please let me know too.

Have fun with this my friends!!!

Talk Tuesdays - Options to Store Your Nail Polishes - WARNING overdose of pictures. Be prepared!!

A few months ago I was looking for a nice way to store my nail polishes. As your collection grows you might notice you can't keep them in that caboodle anymore. Reason? Maybe ... you have too many by now?! lololo And trust me, once you get into the lacquered nails life it's an addiction in your life. A good one though.
Yeah, I realized I had to come up with an easy box, a shelf or something I could keep my nail polishes organized. And my priority was : I need to have them out of the cupboards so I get to use them and not just have them sitting there collecting dust right?
Surfing on the internet I found really cute stuff from all price ranges and tastes - or both together lololo
Be prepared for the overload of pictures. Well, you might be interested in see what I saw throughout my hunting of a nail polish storage. These were the alternatives I found to store your nail polish collection.

A PLASTIC CART
I have seen some people putting their make up in those plastic bins and also nail polish but  that's a little hidden for me. They are a cheap option though.


AN OLD DOLL HOUSE
If I still had my doll house I would probably use it. Look how cute this is. The only thing is that I don't think this would be a good idea while having kids over (nieces and nephews) to your house lololo Bottom line: it wouldn't be a choice for me but I thought I'd share.

Photo: Found on Google. But couldn't find the link . SO if this picture is yours please contact me and I'll put your name under here right away or if you want me to remove it please let me know as well. I am not a photo stealer :)

A CART
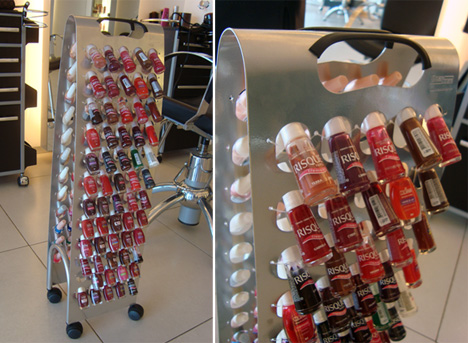
When I went to Brazil and had my nails done I saw this cart and what came out of my mouth was: "Cooooooooooooooollllll" This is super awesome! You can store your polishes and also odds and ends on the bottom. It comes in different sizes depending on the number of shelves on it.
- 8 shelves ( 176 nail polishes)
- 6 shelves (138  "       "         )
- 4shelves (88     "       "         )
It retails around $179. I was studying ways on how I could have that shipped to me here from Brazil. I just Loveeee this!
Carrinho Smaltbell 8

A FURNITURE
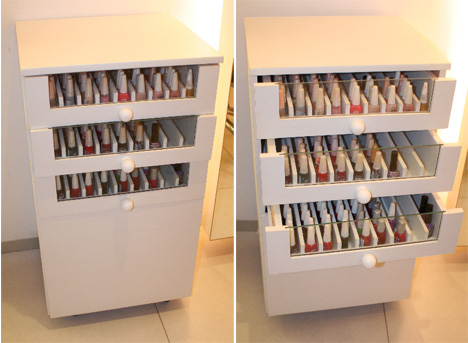
I saw this piece of furniture , lets call it that way. It's a wood stand with draws that you can neatly organize your polishes in line. Isn't that just super adorable? I wish I could find where they sell these. I got these pictures from a brazilian blog though and it seems it was somewhere in Brazil. Dang it! And that's what I'm talking about. If you have your polishes organized like that it's just easy to find them. I'm so in love with it!

movel1

movel2


A PIECE OF INTRIGUING ART
This one I have seen in the nail salons in Brazil too. These cute nail polish carts really catch your attention as they seem to be floating by that big plate. What makes that ilusion to your eyes is the nylon thread holding the polishes by their caps. Such a great idea! What I know is that they are also sold in Brazil and they run around $250. I know, those things can be expensive.


esma2

A SHELF
You can buy them online or just have one custom made for you. These next two were custom made and are against the wall. I really don't know if I would like to have something like that. Sure does look cool! But can you imagine having this and your jealous friend saying : "Oh, I think you have way too many polishes" lololo And plus I don't have that many of bottles to display proudly like that anyways. The fact I like on these ones is that your nail polishes will be screaming at you "Please use me!!" If you put up with a shelf like that you better have your nails all lacquered up.


Now we have these shelves that are smaller and cute.  You can be displaying polish pride on your walls. These Apple racks can be found all over the internet specially on Ebay. And it's sold around $189 sometimes with shipping included.
Photo: Ebay 

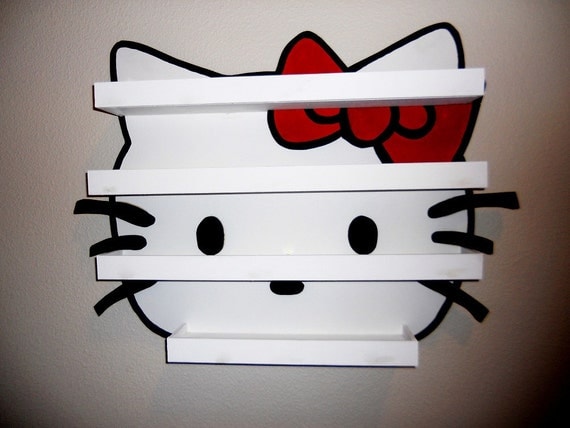
The Hello Kitty rack I found on Etsy. It's for sale $250. Yeah! Back in the days I would be drooling to have one of these in my room.

Hello Kitty nail polish holder (27"x20") 
Photo: Etsy

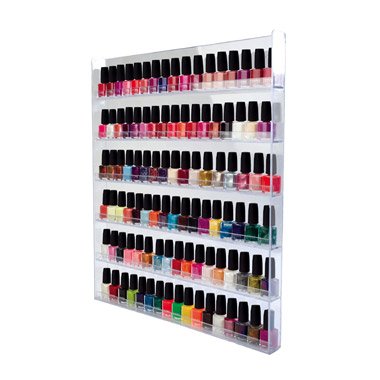
This acrylic nail polish rack it's pretty popular among the polishaholics on duty. They are also to be hang on the wall. I've seen people spreading this all over their walls. When I first started looking for a new home for my polishisss I kinda considered those acrylic wall racks cause I thought they were cheap. Cheap??? No, they are not cheap whatsoever ( They retail for at least $50 plus shipping the little ones). Plus after buying you have to drill wholes in your wall to put them up. I gave up and decided it wasn't what I was looking for anyways. PS: When I say cheap or expensive is based on my budget. I don't know what your are so please don't judge me.

Photo: Alibaba

This one you can also find on Ebay. And like I said the acrylic stuff isn't cheap (this ones are sold for $47.99 +SH). I kinda like this one cause you can put on the table at your station or in your closet or even in your bathroom (if you have a big counter). But when I saw this I didn't love at the point to make a buy decision.
New  Nail Polish / Cosmetic Display / OrganizerPhoto: Ebay $47.99

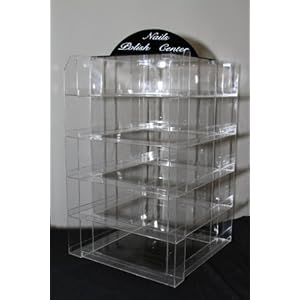
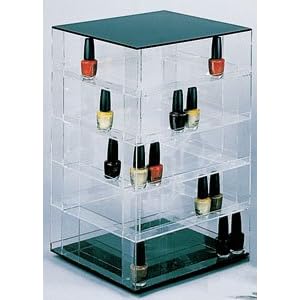
Then I saw these ones and I felt in love. I thought they were different and could serve the purpose I was looking into on a way to store my polishes. They are a nail polish display that rotates. Don't you think this is a have to have it? Imagine your polishes in that carrousel thing where you can just spin it around and tan dan "here is the polish I was looking for"  in a matter of just you deciding on what color you are gonna paint your nails. And because they are acrylic of course they are gonna be a little pricey. But they are just a.d.o.r.a.b.l.e

Nail Polish Table Rack Display (Hold Up To 144 Bottles) Spinable

Nail Polish Rack Display Rotating Fits up to 140 Bottles

I hope you like this post. I thought this could be helpful for some of you out there. When I first started looking for alternatives to store my polish in an organized way I was kinda lost cause couldn't find any blog with a post like that. Yeah let me brag about myself right. But seriously, there you have all of the options I looked into. Being that way it might be a little easier for you to decide what better way suits your taste. And if you have a different way of storaging your babies please drop me a comment here. I would love to hear form you. Don't post links on comments cause they go to spam. So if you have a link please email me at contact.lacqueredme@gmail and I can make a special post just to share your idea.

Now do you wanna guess how I store my polishes? Leave me a comment. If I have lots of sweet comments I might extend this to another post next Tuesday :)
Related Posts Plugin for WordPress, Blogger...